Where to Apply Highlighter for a Glowy, Lit-From-Within Look
All you need to know to create a beautiful glow.
March 06, 2025
Blinding highlighter may feel like a (jarring) throwback to your 2016-era Instagram makeup, but skin that glows and looks radiant will always be in. The key to achieving natural-looking radiance is knowing how to use highlighter, including where to put highlighter for the best results.
While we love a defined, glowing cheekbone, there are several other areas on your face where highlighter can make a beautiful impact. Knowing how to apply highlighter strategically to define your features will help call attention to your best features.
Ahead, we’re sharing everything you need to know about highlighter. Read on to learn where to put highlighter on your face for natural-looking radiance, discover the differences between liquid highlighter and powder highlighter, and more.
Highlighter is a type of makeup product that reflects light to help illuminate your features. It can come in liquid, cream, or powder formulas and be subtly shimmery or nearly metallic. Regardless of the formula, though, the purpose of face highlighter remains the same: to give your skin a glowy, radiant-looking finish.
That being said, knowing how to use highlighter properly is key. Applying too much —or putting it in places the light doesn’t naturally hit—can result in an unnatural look. With glowy makeup like highlighter, a strategic, less-is-more approach is often best.

When applying highlighter, you typically want to stick to the high points of your face (in other words, the areas of your face where the sun would naturally catch the light). We’ll dive into the details and explain where to put highlighter for a natural-looking luminosity, below.
We’re starting with the most common place to highlight your face: the cheekbones. Highlighting the tops of your cheekbones can help emphasize your bone structure and give your face a lifted appearance. We suggest blending your cheek highlighter toward your temples for a soft, diffused effect—any stark or obvious lines will detract from the naturally glowy illusion.
Your Cupid's bow is the little indent at the center of your top lip (so named because of the shape’s resemblance to a bow). Highlighting this area helps to lift the lips and give them a fuller appearance and more defined shape. Just be careful not to highlight your entire top lip—we’re after a subtle glow here, not a shimmer ‘stache.
Editor’s tip: Overline your lips and highlight your cupid’s bow to instantly fake a plumper pout.
You may not give your brow bone much thought, but highlighting the small strip of skin beneath your brows can help make your eyes appear more open, create the illusion of a more lifted brow, and make your eyes pop.
The inner corners of your eyes tend to be more prone to darkness than other areas of the face. Add some highlighter to brighten this area and give your eyes a more wide-awake appearance.
Yup, this is a weird one, but it can truly work wonders. Like the inner corner of the eyes, the under-eye area can be dark, and highlighting is a useful technique for neutralizing the appearance of dark circles. That being said, it’s best to avoid shimmer highlighters here—instead, opt for a luminous formula in a shade that closely matches your natural skin tone.
Another great way to brighten your eyes (and overall look) is by adding a subtle highlight to the center of your eyelids. While this might not be fitting if you’re going for a nude smokey eye, it’s a great way to look more awake while adding some glow on no-makeup makeup days.
Adding the smallest touch of highlighter to the bridge of your nose can help round out your glowy look and create a believable fresh-from-the-beach effect. Again, take care to use a light hand here—less is definitely more where nose highlight is concerned.
Cream, powder, and liquid highlighters all have their merits, and choosing which one is best for you ultimately comes down to what kind of look you’re after.
If you’re aiming to create a dewy, glass skin effect, cream highlighters are often your best bet. They’re buildable, blendable, and typically easy to apply, even without a brush or sponge. For a one-and-done application, try the L’Oréal Paris Lumi Le Glass Highlighter Stick. These creamy highlighter sticks come in six shades—three glassy, three glowy—and boast a lightweight formula that melts into the skin for a gorgeous, multi-dimensional glow.

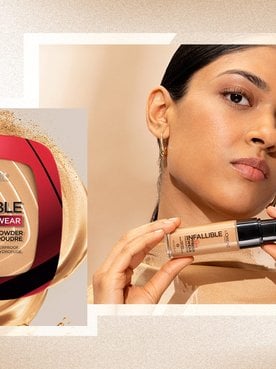
For those with oily skin, we suggest opting for a powder highlighter—these versatile formulas help add radiance without leaving your skin looking shiny or greasy. When using a powder highlighter, we suggest opting for a formula that offers buildable coverage so you can tailor your glow to your liking. The L’Oréal Paris Infallible Up To 24HR Highlighter Longwear Powder is an excellent pick—and it offers up to 24 hours of heat, water, and transfer-resistant wear.

Finally, there are liquid highlighters, which—as the name implies—have a fluid, liquid consistency. Like cream formulas, liquid highlighters tend to be relatively easy to apply and blend—even if you don’t have a brush or makeup sponge on hand (you can just use your fingers). For a luminous glow, try the L’Oréal Paris True Match Lumi Glotion Natural Glow Enhancer. The versatile formula can be used to illuminate your features like a normal highlighter, or you can mix it with your foundation to give your base a glowier finish. It even doubles as a hydrating makeup primer (just smooth it over your face after completing your skincare routine).
Knowing where to put highlighter is only part of the equation—equally important is learning how (and when) to use it in your routine. We’re breaking down the must-follow steps below.
Proper skin prep is the key to getting the most out of your makeup application. Wash your face as usual, then smooth on a facial serum and moisturizer to help hydrate your skin. In the daytime, complete your routine with a broad-spectrum sunscreen to help shield your skin from the sun. If you need a recommendation, we’re partial to the L’Oréal Paris Bright Reveal Broad Spectrum SPF 50 Daily UV Lotion. It’s lightweight, non-greasy, and helps prime your skin for makeup—so you can skip your usual priming step and move right onto your makeup routine.
Next, even out your skin tone with a foundation. If a your-skin-but-better look is what you’re after, we suggest opting for a buildable foundation, like the L’Oréal Paris Infallible 32 Hour Fresh Wear Foundation, which is lightweight, breathable, and boasts a natural-looking finish. Then, go in with the L’Oréal Paris Infallible Full Wear Concealer Up To 24H Full Coverage to help conceal any spots that need a bit of additional coverage, such as your under-eye area.
Before moving on to your highlighting step, sculpt and define your features with contour and blush. Choose your textures based on the finish you're aiming for—creamy for dewiness, powder for matte. Contour below the cheekbones and along the temples, then add a flush of color with blush on the cheeks, blending towards the ears for a lifted appearance.
And now, the moment we've all been waiting for—highlighter time. If you're going with a highlighter stick like the L’Oréal Paris Lumi Le Glass Highlighter Stick, you can swipe it directly onto the areas you’d like to illuminate—no tools needed. Liquid highlighters like the L’Oréal Paris True Match Lumi Glotion Natural Glow Enhancer, meanwhile, can be dotted onto the face and blended out with the tool of your choice (fingertips, brushes, and sponges all work).
For powder highlighters like the L’Oréal Paris Infallible Up To 24HR Highlighter Longwear Powder, you’ll need a brush. We suggest using a fan brush for your cheekbones and a smaller fluffy brush for the smaller areas like your inner corners and brow bones. Start with a light dusting and build up the product gradually to create a soft, diffused glow.
Last but definitely not least, you’ll want to make sure your glow goes the distance. A quick misting of the L’Oréal Paris Infallible 3-Second Setting Mist will help keep your makeup in place all day long, all while leaving behind a glowy, natural-looking finish.
There are no hard and fast rules for layering your highlighter and blush, but some guidelines can help you achieve a more seamless end result. If you're coordinating your products by formula—pairing powders with powders or liquids with liquids—a little insider tip is to sweep on your highlighter before your blush. This technique allows the blush to softly blend into the highlighter for a flawless, radiant finish.
However, if you're in the mood to mix things up and combine liquid and powder formulas, start with your liquid products first—powders don’t layer very well on top of liquids.
When you apply your highlighter is largely up to you, but you’ll typically get the best results if you apply it after foundation—especially if you’re using a cream or powder formula. If you’ve opted for a liquid highlighter, there’s a bit more flexibility. Applying liquid highlighter before foundation can create all-over luminosity, while applying it afterward can help create a more defined, targeted glow. You can even mix a few drops of your liquid highlighter into your foundation to sheer it out and give it a more luminous finish.
Makeup isn't meant to be taken too seriously—you should always feel free to experiment and find what makes you feel your best. However, if you're aiming for the most natural and flattering effects, we recommend focusing on the areas outlined above. This will help create a luminous look that puts your features in the best light.
Next Up: How To Build a Natural Makeup Routine, Plus 15 Fresh-Faced Looks
Photo courtesy of L’Oréal Paris
This site is intended for US consumers. Cookies and related technology are used for advertising. To learn more, or opt-out, visit AdChoices and our privacy policy.
Your Privacy Choices