How To Use Permanent Hair Dye for Touching Up Roots
Plus, tips for making your color last.
DISCOVER OUR NEW ARRIVALS. SHOP NOW

Keeping your color looking fresh between salon visits often comes down to one thing: staying on top of your roots. As your hair grows out, your natural color starts to peek through at the root, creating a noticeable contrast against your dyed lengths. While temporary solutions can help disguise regrowth in a pinch, they don’t offer much staying power. For lasting coverage, it’s best to use a permanent hair dye for touching up roots.
If you’re used to relying on temporary root touch-ups or hitting the salon for a refresh, using permanent dye at home might feel intimidating. But with the right tools and technique, doing a hair color touch-up at home is easier than you might think. Ahead, we’ll break down how to choose the right color to cover your roots, walk you through a step-by-step application process, and share a few expert tips to help you get it right every time.
A root touch-up is a targeted hair coloring technique that involves applying dye only to the regrowth at your roots, rather than your entire head. The goal is to blend your natural root color with the rest of your lengths for a seamless finish. The best way to achieve this is with a permanent hair dye for touching up roots—temporary root touch-up kits are more of a stopgap measure.
Unlike a full dye job, which saturates your hair from roots to tips, a permanent root touch-up is all about precision. You’re only applying color where it’s needed most, which helps minimize damage from over-processing and keeps your existing color looking fresh for longer.
The best root touch-up formula depends on your existing color, natural hair color, and goals. If your color was originally done at a salon—especially if it’s a custom blend—it’s often best to go back to your colorist for root maintenance so they can match your shade exactly. But if you DIY your color, touching up your roots at home is pretty straightforward. Here are a few things to consider when choosing a permanent hair dye for touching up roots:
Choose a color that matches the depth of your existing shade as closely as possible. Hair dye levels typically range from 1 (black) to 10 (light blonde), and picking the right level helps ensure your roots don’t appear too dark or too light compared to your lengths. If you’re stuck between two shades, opt for the lighter of the two for a more natural-looking finish.
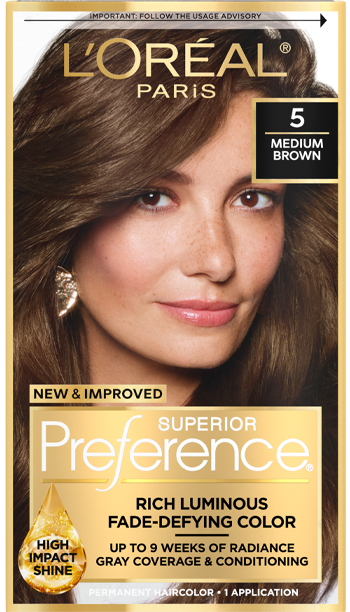
Pay attention to whether your current color leans warm, cool, or neutral. Matching the undertone—whether it’s golden, ashy, or red—helps create a more natural, blended result. The L’Oréal Paris Superior Preference Fade-Defying Shine Permanent Hair Color comes in 50 luminous shades in warm, cool, and neutral undertones, so you can easily find a root hair color that matches your lengths.
If you’re covering grays, use a permanent dye specifically formulated for gray coverage. These formulas are designed to fully saturate resistant strands and provide more even, long-lasting results. The aforementioned L’Oréal Paris Superior Preference Fade-Defying Shine Permanent Hair Color is a great option, as it delivers up to nine weeks of fade-defying shine and covers 100% of grays. If you’d prefer to use an ammonia-free hair color, we love the L’Oréal Paris Excellence Creme Universal Nudes Ammonia Free Permanent Hair Color.

Before getting started on your root color touch-up, gather the following tools and supplies:
Editor’s note: Many at-home root touch-up kits contain most of the tools you need to color your hair, including gloves and an applicator brush. The L’Oréal Paris Magic Root Permanent 10 Minute Root Coloring Kit, for example, comes with an applicator brush for an easy application. If you’re using a coloring kit, read the package to see what’s included inside so you don’t accidentally double-up on tools.

Before you start your root touch-up, taking a few prep steps can make the process smoother and help your color turn out perfectly. Proper preparation also protects your hair and skin from unwanted staining or uneven coverage. Here are a few things to keep in mind:
Once you’ve picked the right dye and gathered all your tools, it’s time to get started. Following these steps will help you touch up your roots like a pro, giving you even, seamless color without the stress.
Dividing your hair into sections is one of the most important steps for a smooth, even root touch-up. Start by parting your hair down the middle from your forehead to the nape of your neck, creating two halves. Then, create a horizontal part across the back of your head, roughly from ear to ear, which gives you four main sections—two at the front and two at the back. Clip each section securely so it stays out of the way while you work.
Working in these sections helps you apply the dye more precisely and ensures that no spots are missed, especially around the hairline, crown, and behind the ears, where regrowth is often most noticeable. If you have thicker or longer hair, you can further subdivide each section into smaller panels to make application even more manageable.
Next, take a few minutes to carefully read the instructions that come with your hair dye. Measure and mix the color and developer exactly as directed, whether you’re using the applicator bottle or a separate mixing bowl. Getting the proportions right is key—too much or too little developer can affect how well the color develops, which can lead to uneven coverage or a shade that doesn’t match your existing color.
After sectioning your hair and mixing your color, you’re ready to get started. Unclip one of the sections you created earlier and divide it into smaller subsections to make the application easier and more precise. Using an applicator brush, sweep the dye directly onto your roots, extending it ever so slightly past the line of demarcation where your natural hair meets your dyed lengths. This small overlap ensures a seamless blend and full coverage of every strand of regrowth. Work through each subsection carefully before moving on to the next, and repeat with the remaining sections to achieve even coverage across your entire head.
Once your roots are fully coated, let the dye process for the amount of time specified in the instructions. Avoid leaving it on too long, which can lead to overly dark or uneven color, but don’t rinse too early—full processing time is key for complete coverage, especially for grays.
After the processing time is complete, rinse your hair thoroughly with lukewarm water until the water runs clear. Follow with the conditioner provided in your dye kit, or use a color-safe conditioner to lock in moisture and enhance shine.
Even with the best products and tools, root touch-ups can go off track if you’re not careful. Avoid these common mistakes to ensure your color turns out seamless and long-lasting:
How often you need to touch up your roots depends on a few factors, but most people find that every four to six weeks works well for maintaining a consistent color. A good rule of thumb is to wait until about a half-inch to an inch of natural hair is showing at the roots before re-dyeing—any less, and the touch-up may be unnecessary; any more, and the contrast can start to look obvious.
If your hair grows quickly or the difference between your natural color and dyed lengths is high—like when covering grays or going from dark to light shades—you may need to refresh your roots more frequently. Conversely, if your hair grows slowly or the contrast is subtle, you might be able to stretch the time between touch-ups a bit longer. Keeping an eye on visible regrowth is the best way to know when it’s time for your next application.
Taking care of your hair after a root touch-up is just as important as the application itself. The right aftercare routine can help your color last longer, keep your strands healthy, and maintain a vibrant, salon-fresh look. Below, we’re sharing a few pro tips to help your color go the distance.
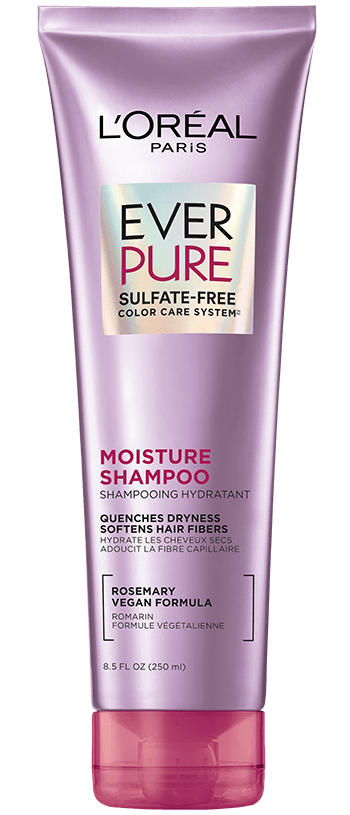
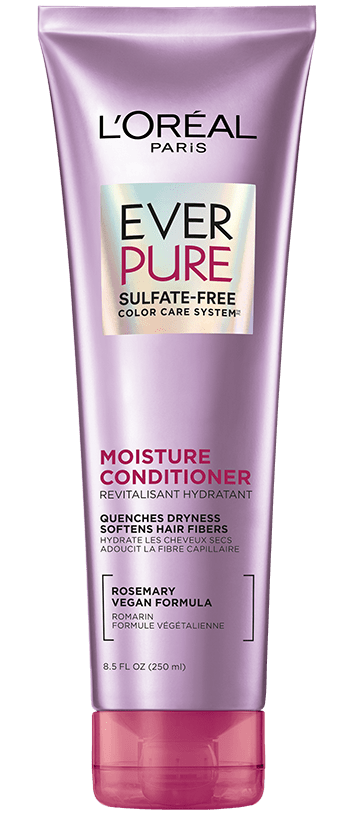
After coloring your hair, it’s a good idea to switch to a shampoo designed for color-treated strands. These formulas are designed to remove dirt, oil, and product residue without stripping your color, making them ideal for maintaining your hue. If your hair feels dry after repeated coloring sessions, try the L’Oréal Paris EverPure Sulfate-Free Moisture Shampoo—it’s formulated with rosemary and instantly hydrates and softens dry, thirsty strands. Pair it with the coordinating L’Oréal Paris EverPure Sulfate-Free Moisture Conditioner (applied to your mid-lengths and ends) for long-lasting hydration.
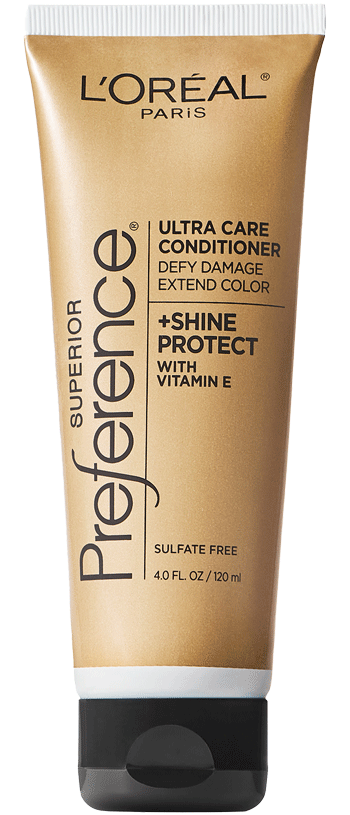
Coloring your hair can leave it drier or more fragile than usual. Incorporate a deep conditioning treatment once or twice a week to restore moisture, strengthen strands, and maintain shine. For the best results, use a conditioner specifically designed for color-treated hair, such as the L’Oréal Paris Superior Preference Shine Protect Ultra Care Conditioner. The rich formula deeply hydrates, helps extend your hair color, and leaves strands glossy and healthy-looking.
Frequent use of hot tools can strip color-treated hair of moisture, making it appear dull and one-dimensional. When possible, forgo blow-drying, flat ironing, or curling your hair and opt for heatless hairstyles instead. If you must use heat, be sure to prep your strands with a high-quality heat protectant to minimize damage. We recommend the L’Oréal Paris EverPure Sulfate-Free Moisture 21-in-1 Leave-In Conditioner, which protects against temperatures up to 450 degrees Fahrenheit and is designed specifically for color-treated strands.
In addition to using color-safe products, there are simple habits that can help your color last longer. Wear a hat when outdoors to shield your hair from sun damage, rinse your hair before swimming to reduce exposure to chlorine, and try to avoid prolonged contact with hard water. Small steps like these can make a big difference in keeping your roots—and your overall color—looking fresh.

Sometimes, visiting a colorist is the best way to ensure your color looks seamless and healthy. Consider seeing a professional if your current color is a custom blend, as matching it perfectly at home can be tricky. You should also consult a stylist if your root color is significantly different from your lengths, since major contrasts can be difficult to balance without creating uneven tones.
Finally, if you’re dealing with a lot of grays, a stylist may be able to help you cover them more effectively. But remember that even the best permanent root touch-up for gray hair will require frequent upkeep to maintain. If you’re not ready to commit to monthly salon visits, you may want to ask your stylist about blending your grays or slowly transitioning to gray instead.
Yes, you can use permanent dye every time you color your roots. However, to prevent unnecessary damage, it’s best to wait until you have about a half inch to an inch of regrowth, and avoid overlapping dye onto your previously-colored lengths.
To prevent stark lines of demarcation when coloring your roots, blend your dye just slightly past your roots onto your lengths. This helps the two shades flow together seamlessly for a blended, even finish.
Generally speaking, it’s best to color your hair when it’s dry. Wash your hair one to two days before you plan to color your roots unless otherwise instructed on the product packaging.
This site is intended for US consumers. Cookies and related technology are used for advertising. To learn more, or opt-out, visit AdChoices and our privacy policy.
Your Privacy Choices


